
Over the past few months we’ve been spending more time preparing meals at home. It seems like eating out 3 nights a week was so long ago. What has changed for us was the way we would approach recipes. Thanks to early challenges of grocery shopping it’s actually forced us to rethink not only what we eat but how we prepare our meals. Just like ingredients, if you have the right equipment on hand, then cooking is way more enjoyable..and flexible. When I first researched the Ninja Kitchen Foodi, I was blown away with the many features. I first was looking at a pressure cooker but this beauty does much more. Think air crisper, slow cooker, dehydrator and pressure cooker rolled into one. It’s useful and compact appliance especially if you’re tight for space in your kitchen.
I joined a Facebook group to learn unbiased opinions, tips and tricks from thousands of fans across North America. That convinced me to give away my dehydrator, air fryer and slow cooker without hesitation. So, here we are. I’m now the owner of this multi-purpose kitchen appliance that does more than I could imagine and over the past month I’ve been exploring what it can do. Sure you can make wings, beef stew, scalloped potatoes, mac n’ cheese and even dessert efficiently. Lots of recipes come with the appliance but I’m not really a “steak and potatoes” kind of person. I wanted to see if I could recreate some of my favourite dishes inspired by the amazing restaurants here in Toronto. Hainanese Chicken (Jackpot Chicken needs to come back), Chicken Biryani (from Copper Chimney Indian), Blistered Shishito Peppers (from Chotto Matte), Khao Soi (from Pai Northern Thai), dumplings (from Mother’s Dumplings), Kimchee Jjigae (from Owl of Minerva)…my list is long. You get the picture!
There are different variations of Chicken Biryani and many great family recipes that I’ve been fortunate to enjoy over the years. This recipe has been adapted for the Ninja Kitchen Foodi — it’s simple and tasty. Next time I’ll toast cashews at the end as a garnish. I played around with the ingredients and adjusted until I had something similar to the Biryani I love and made quick enough for a perfect weeknight dinner dish or lunch.
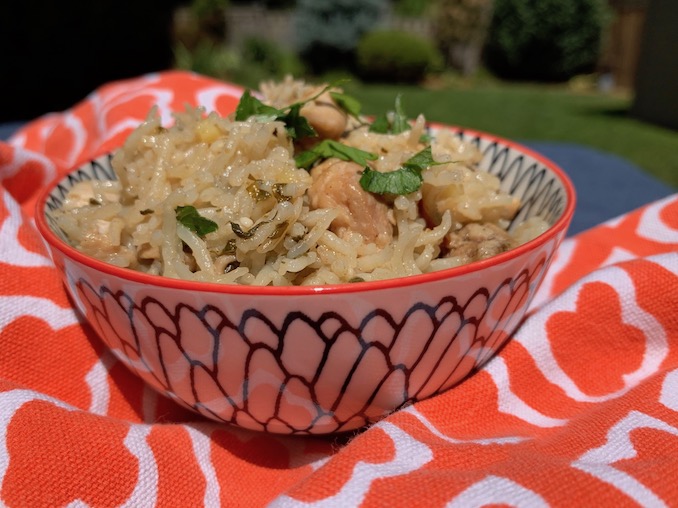
CHICKEN BIRYANI (Serves 4)
Ingredients:
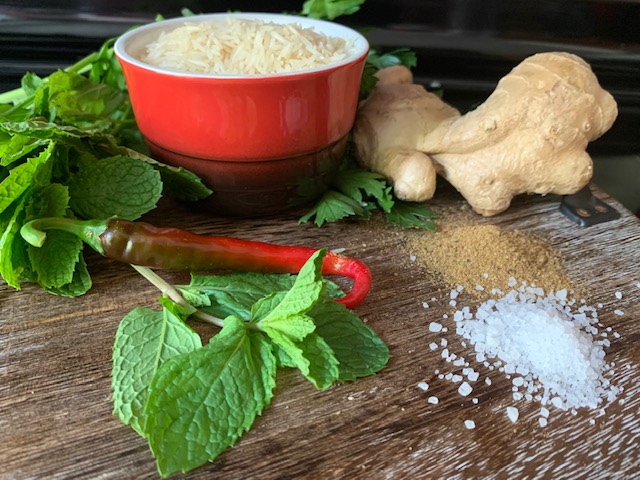
- 2 tbsp ghee (or butter)
- 2 tbsp Garam Masala
- 1 medium size yellow onion, sliced
- 2 tbsp fresh ginger, finely chopped
- 2 tsp garlic, minced
- 1 red chili pepper, finely chopped
- 2 tbsp cilantro, finely chopped
- 2 tbsp fresh mint, finely chopped
- 4-6 boneless skinless chicken thighs cut into small pieces
- 1 cup uncooked Basmati rice, rinsed and drained
- 1 cup chicken broth
- salt to taste
Method:
1.Heat up the Ninja Foodi using the cooking vessel on “Saute” for 5 minutes.
2.Add ghee or butter, onions and saute (with lid open) until onions soften.
3.Add ginger, garlic, and chili pepper and continue to saute for 2 minutes.
4.Add in chicken pieces, salt and Garam Masala. Continue to saute so everything is mixed together well and chicken continues cooking.
5.Even out the chicken mixture on the bottom of the pot. Then evenly layer the cilantro and mint.
6.Evenly top with the rice and add in chicken broth. Gently pat down so liquid soaks the rice.
7.Attach the Pressure Cooking Lid, close and secure/lock into place. Make sure the vent is on “seal”.
8.Program the Ninja Foodi to “pressure cook” for 7 minutes. Then let it sit for another 10 minutes. Do not open!
9.After the 10 minutes, switch the “seal” to “vent” and allow it to release the remaining pressure before opening.
10.Open carefully and mix up the rice and chicken. Serve immediately.
Optional Garnishes: fresh chopped cilantro, toasted chopped cashews or almonds, raisins

***
Handy tips for first-time users of the Ninja Kitchen Foodi:
This equipment can be intimidating at first. Make sure you read the operating manual and do the recommended water test to help understand how the pressure cooking feature works. For someone like me who’s never owned a pressure cooker, this helped me gauge and understand the basics.
You’ll want to make sure you have plenty of counter space that is also well ventilated. Start slowly by creating some of the recommended recipes to get a feel for the features. It will take no time to understand how handy this appliance really is.
The Ninja Kitchen Foodi has two lids – one for the pressure cooking and another for crisping. The latter is permanently attached to the appliance. The pressure cooking lid can be removed and washed however the crisping lid requires wipe down cleaning. It also comes with a removable cooking vessel as well as a rack – both easy to clean.
By the way, the one I’m using is the Ninja Foodi 6.5 QT (7.29 L) Pressure Cooker That Crisps with TenderCrisp technology that pressure cooks to lock in juices and can also finish with a crisp when needed. Something other pressure cookers cannot do. Good for making dishes for 2 to 4 people.